
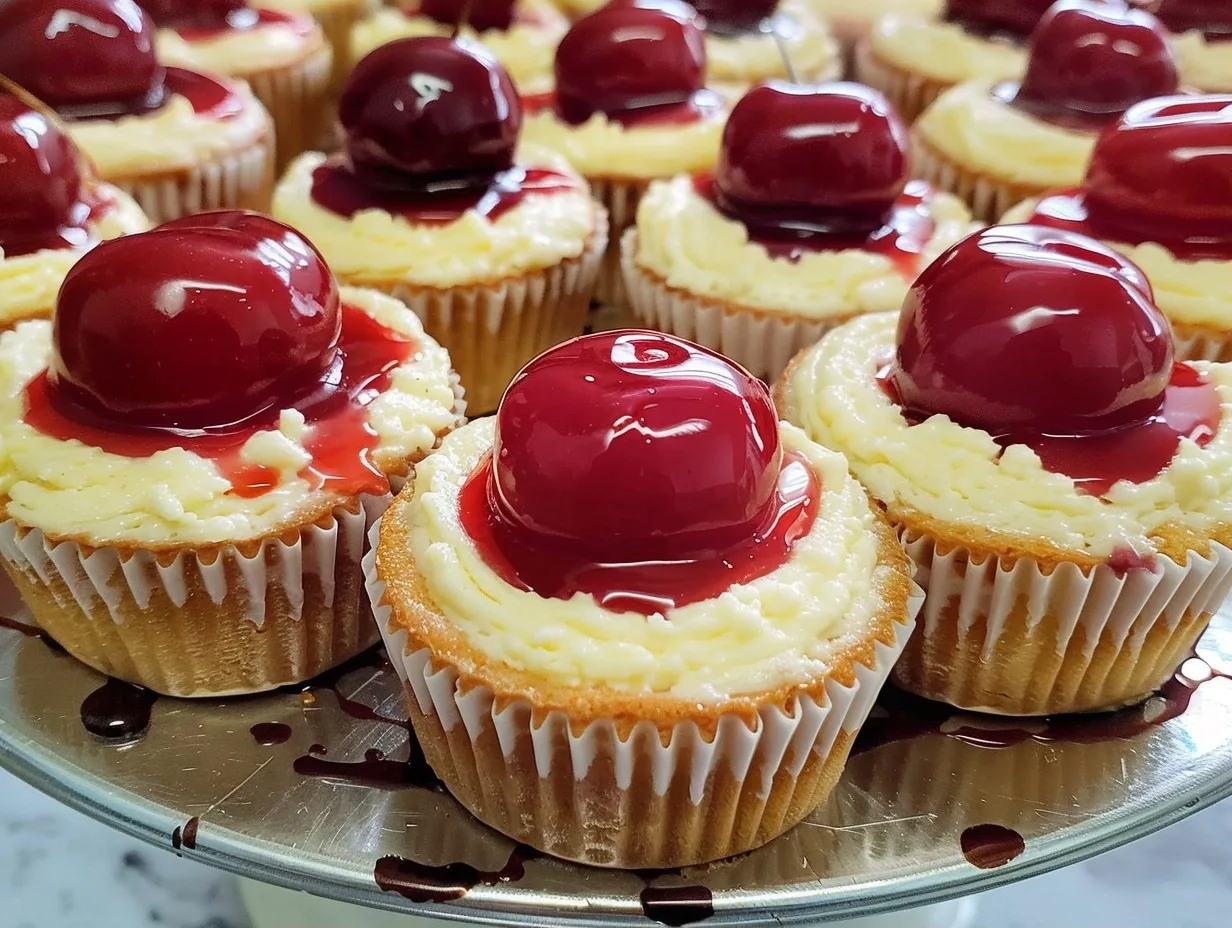
There is something inherently magical about a dessert that comes in its own individual serving. These mini cherry cheesecakes are my go-to treat when I want to impress guests or simply brighten up a weeknight at home. Each bite offers a velvety, rich cheesecake base anchored by a sweet, buttery vanilla wafer, all topped with a vibrant pop of cherry goodness. They capture that classic bakery taste without the need for a water bath or complex baking techniques.
I have spent years perfecting cheesecake recipes, and I keep coming back to these minis for their sheer simplicity and reliability. Whether you are hosting a holiday party, a summer gathering, or just craving a little indulgence, these handheld wonders are guaranteed to disappear from the platter within minutes. They provide the perfect balance of tanginess from the cream cheese and deep sweetness from the cherry topping.
Why You Will Love This Recipe
- Easy to make: No fancy equipment or complicated water baths required.
- Perfect portions: Each mini cheesecake is perfectly sized for individual snacking.
- Family favorite: Kids and adults alike find them irresistible.
- Time-saver: They chill quickly, making them ready to serve sooner than a full-size cake.
- Beautiful presentation: The bright red cherry topping looks stunning against the pale, creamy cheesecake.
Recipe Quick Facts
| Prep Time | 15 minutes |
| Cook Time | 22 minutes |
| Total Time | 2 hours 37 minutes |
| Servings | 15 mini cheesecakes |
| Difficulty | Easy |
Ingredients You Will Need
To achieve that signature silky texture, ensure your cream cheese is completely at room temperature before you begin mixing. This prevents lumps and ensures a smooth, decadent batter.
- 15 vanilla wafer cookies: These serve as the perfect crunch for the base.
- 16 ounces full-fat cream cheese: Use the block style for the best structure.
- 3/4 cup granulated sugar: Provides the ideal level of sweetness.
- 2 large eggs: Use room temperature eggs for easier incorporation.
- 1 teaspoon vanilla bean paste: This adds those beautiful little vanilla flecks, though regular extract works too.
- 1 can cherry pie filling: Look for a high-quality brand with lots of whole cherries.
Kitchen Tools You Will Need
- Electric hand mixer or stand mixer
- Two 12-cup muffin pans
- Cupcake liners
- Large mixing bowl
- Rubber spatula
How to Make Mini Cherry Cheesecakes
The secret to these cheesecakes is taking your time during the mixing process to incorporate air, which yields a light, airy, and professional finish.
- Preheat your oven to 350°F. Line your muffin pans with paper cupcake liners. You will need 15 liners in total. Place one vanilla wafer cookie at the bottom of each liner.
- In a large mixing bowl, beat the 16 ounces of softened cream cheese until it is completely smooth and creamy. Gradually add the 3/4 cup of sugar while the mixer is on low speed. Once combined, increase the speed to medium and beat for one minute to ensure lightness.
- Add the eggs one at a time, beating thoroughly after each addition to fully incorporate the structure into the batter. Stir in your vanilla bean paste or vanilla extract until well combined.
- Using a muffin scoop or a large spoon, distribute the cheesecake batter into the prepared liners. Fill each cup about 3/4 of the way full.
- Bake for 20 to 22 minutes, or until the cheesecakes look set in the center. They might jiggle slightly, which is perfect. Remove from the oven and let them cool completely in the pan.
- Once at room temperature, transfer the pans to the refrigerator for at least 2 hours to firm up. Before serving, add a generous dollop of cherry pie filling to the center of each cheesecake.
Pro Tips for the Best Results
For the smoothest batter, never skip the step of softening your cream cheese to room temperature. If you are in a rush, you can remove the cream cheese from its packaging and microwave it on a low power setting for 15 seconds, but be careful not to melt it. Always beat the eggs one at a time to keep the batter uniform and prevent the mixture from splitting. If you notice tiny lumps, simply beat on medium-high for an extra 30 seconds.
Variations and Substitutions
If you want to swap out the flavors, feel free to use chocolate wafers instead of vanilla for a more decadent base. If you prefer a different fruit, blueberry or strawberry pie filling makes a wonderful alternative to cherry. For a lighter version, you can experiment with reduced-fat cream cheese, although keep in mind that full-fat will always deliver the creamiest, most authentic result.
What to Serve With Mini Cherry Cheesecakes
These desserts are rich and satisfying on their own, but they pair beautifully with a cup of hot black coffee or an iced vanilla latte. If you are serving them at a party, arrange them on a tiered platter alongside fresh berries or a side of whipped cream to create a beautiful dessert spread.
Storage and Reheating
Store your leftover mini cherry cheesecakes in an airtight container in the refrigerator for up to four days. If you find yourself with too many to eat, they freeze remarkably well. Place them in a freezer-safe container for up to two months. When you are ready for a treat, let them thaw overnight in the refrigerator for the best texture.
Frequently Asked Questions
Can I make these ahead of time?
Yes, these are actually better when made ahead. They store perfectly in the refrigerator for up to four days, making them a stress-free dessert for any event.
Can I freeze these cheesecakes?
Absolutely. You can freeze them for up to two months. Simply thaw them in the refrigerator overnight before topping them with the cherry pie filling.
How do I know when they are done baking?
The cheesecakes are done when the edges look set and the center has a slight, consistent jiggle. Avoid overbaking, as this can lead to cracking on the surface.
Final Thoughts
There is nothing more rewarding than serving a dessert that looks like it came from a professional bakery but tastes like home. These mini cherry cheesecakes are designed to bring a little extra joy to your table, whether you are celebrating a big milestone or just having a quiet evening. I hope you enjoy every bite of these creamy, fruity treats. Please leave a comment and rating below if you make them, and don’t forget to share your creations on Pinterest!
Print
Easy and Creamy Mini Cherry Cheesecakes
- Total Time: 157
- Yield: 15 mini cheesecakes
- Diet: Vegetarian
Description
These delightful mini cherry cheesecakes offer a velvety, rich cheesecake base anchored by a sweet, buttery vanilla wafer, all topped with a vibrant pop of cherry goodness. Perfectly portioned and impressively simple, these handheld treats capture the classic bakery taste without the need for a water bath. Ideal for gatherings or a quiet indulgence, they are sure to vanish from the platter in minutes, providing the perfect balance of tangy cream cheese and sweet fruit.
Ingredients
15 vanilla wafer cookies
16 ounces full-fat cream cheese, softened
3/4 cup granulated sugar
2 large eggs, room temperature
1 teaspoon vanilla bean paste
1 can cherry pie filling
Instructions
Preheat your oven to 350°F and line 15 muffin cups with paper liners.
Place one vanilla wafer cookie at the bottom of each liner.
In a large mixing bowl, beat the cream cheese and granulated sugar until smooth and creamy.
Add the eggs one at a time, beating on low speed until just combined.
Stir in the vanilla bean paste.
Spoon the batter into the prepared muffin liners, filling each about three-quarters full.
Bake for 22 minutes or until the centers are just set.
Remove from oven and allow to cool completely in the pans before moving to the refrigerator to chill.
Top each cooled cheesecake with a generous spoonful of cherry pie filling before serving.
Notes
Ensure your cream cheese is completely at room temperature to avoid lumps in your batter. Do not overmix the eggs, as this can cause the cheesecakes to crack. Store in the refrigerator for up to 3 days.
- Prep Time: 15
- Cook Time: 22
- Category: Desserts & Sweets
- Method: Baking
- Cuisine: American