
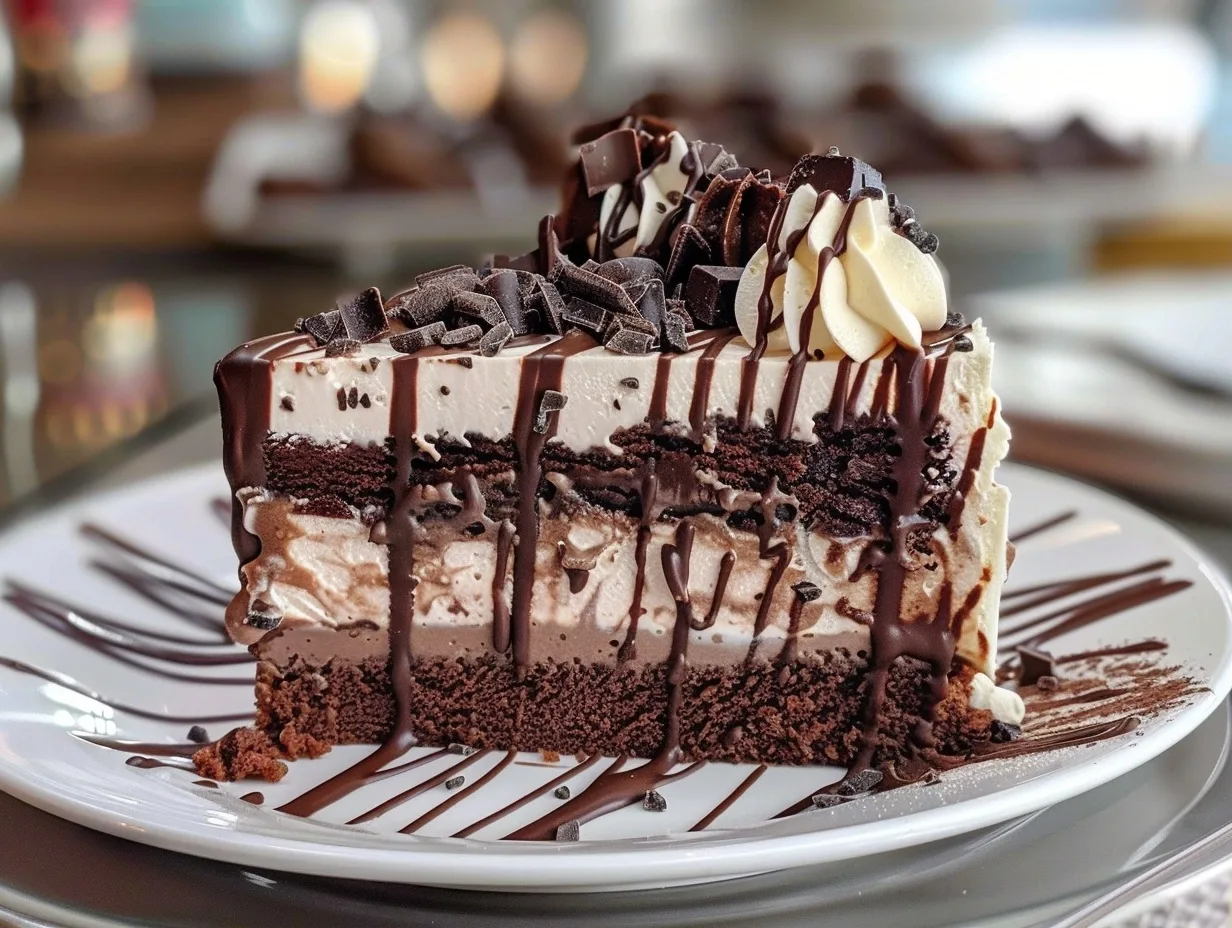
Enjoy this decadent homemade chocolate ice cream cake as the perfect centerpiece for your next family milestone or weekend dinner.
Making a chocolate ice cream cake at home creates warm memories and allows you to control exactly what goes into your dessert. This layered treat combines rich cocoa cake with a creamy vanilla-fudge filling that tastes better than anything you can buy at the store. It remains a reliable favorite when you need a crowd-pleasing dessert that feels special but remains approachable for any home baker.
| Prep Time | Cook Time | Total Time | Servings | Difficulty | Cuisine |
|---|---|---|---|---|---|
| 30 minutes | 30 minutes | 8 hours | 10 | Easy | American |
Why My Family Loves This Recipe
- The combination of moist chocolate cake and cool, creamy vanilla filling feels like true luxury in every bite.
- It is a freezer-friendly dessert that allows you to prepare everything well in advance for stress-free party hosting.
- Kids adore the fudge swirls hidden throughout the layers because they provide a rich, fudgy texture with every forkful.
- This recipe uses basic pantry staples that you likely already have in your kitchen cabinets.
Ingredients
Gather these simple ingredients to assemble your layers. Always use high-quality cocoa powder for the best flavor result.
| Quantity | Ingredient | Notes |
|---|---|---|
| 1 cup | All-purpose flour | May substitute with gluten-free blend. |
| 1 cup | Granulated sugar | Do not reduce to ensure proper crumb. |
| 3/8 cup | Dark cocoa powder | Hershey’s Special Dark works best here. |
| 1 tsp | Baking soda | Check for freshness. |
| 1 large | Egg | Room temperature helps with mixing. |
| 1/2 cup | Buttermilk | Provides the necessary tang and moisture. |
| 1/2 cup | Vegetable oil | Neutral flavor oil is best. |
| 3/4 tsp | Vanilla extract | Use pure extract for better flavor. |
| 1/2 cup | Boiling water | Essential for blooming the cocoa. |
| 8 oz | Cream cheese | Must be fully softened. |
| 8 oz | Cool Whip | Thawed completely before use. |
| 1 cup | Hot fudge | Standard jarred sauce is perfect. |
How to Make It
Preparing the Chocolate Cake
- Preheat your oven to 300 degrees Fahrenheit.
- Whisk the flour, sugar, cocoa powder, and baking soda together in a large mixing bowl until uniform.
- Add the egg, buttermilk, and vegetable oil to the dry mixture and beat until smooth.
- Stir the vanilla extract into the boiling water, then carefully add this to your cake batter.
- Distribute the batter evenly into two 8-inch springform pans.
- Bake for 25 to 30 minutes, or until a toothpick inserted into the center comes out clean.
- Cool the cakes in the pans for 10 minutes before transferring them to a wire rack.
Creating the Ice Cream Filling
- Beat the softened cream cheese, sugar, milk, and vanilla together in a stand mixer until creamy.
- Fold in the Cool Whip and mini chocolate chips using a spatula.
- Slowly swirl in half of the hot fudge, being careful not to over-mix into the cream.
Assembling the Cake
- Line the sides of your 8-inch springform pan with tall strips of parchment paper.
- Place one cake layer into the bottom of the prepared springform pan.
- Spread half of the ice cream mixture over the cake layer.
- Dollop 1/4 cup of hot fudge over the ice cream and swirl it gently with a knife.
- Add the second cake layer and cover it with the remaining ice cream.
- Drizzle the final portion of hot fudge on top and swirl to finish.
- Freeze the entire assembly for 6 to 8 hours until completely set.
Mom Tips and Hacks
Preparation is everything when working with frozen desserts. I always keep my springform pans lined with parchment paper that extends two inches above the rim, which makes lifting the frozen masterpiece out of the pan both clean and simple. If you are prepping for a birthday, you can make the cake layers two days in advance and keep them wrapped in plastic in the fridge. This keeps the kitchen cool on party day.
Easy Variations
You can easily adjust this recipe to suit dietary preferences or simple flavor cravings. For a lighter version, try using reduced-fat cream cheese or a low-fat whipped topping alternative. If you want to boost the protein, serve the cake alongside a small bowl of Greek yogurt or top the slices with a handful of crushed nuts like walnuts or pecans. To make a dairy-free version, use coconut-based whipped topping and a plant-based cream cheese alternative for the filling layers.
What to Serve With It
This cake is quite rich on its own, so I prefer serving it with fresh berries to add a bright, acidic contrast to the heavy chocolate. Sliced strawberries or fresh raspberries pair perfectly with the fudge swirls. For a special backyard gathering, serve individual portions alongside a cold glass of milk or a scoop of fresh fruit salad. It also pairs beautifully with a warm cup of coffee for the adults once the kids have settled down for the evening.
Storage and Leftovers
Proper storage is essential for maintaining the texture of your ice cream cake. Once the cake has set, store any leftovers inside the freezer covered tightly with plastic wrap or in an airtight container for up to one week. If you plan to keep it longer, wrap the cake in a layer of foil to prevent freezer burn. When ready to serve again, pull it out of the freezer for about ten minutes so it becomes easier to slice, but do not let it sit out on the counter too long.
FAQ
Can I use regular cocoa powder instead of dark cocoa?
You can certainly use regular cocoa powder, although the chocolate flavor will be slightly milder. The final color of your cake will be lighter, but it will not affect the structural integrity of the dessert.
How do I know when the cake is fully set?
The cake is ready when the center feels firm to the touch and no longer ripples when the pan is moved. Always ensure the ice cream has been in the freezer for at least six full hours.
Can I add layers of other flavors?
You can easily add layers of crushed cookies or peppermint pieces between the ice cream and cake layers for extra texture. Just ensure you do not add too much moisture, as it can make the cake layers soggy.
Why did my cake stick to the pan?
Using a springform pan is the best way to prevent sticking, but lining the bottom with parchment paper ensures a clean release every single time. If the sides still stick, run a thin butter knife around the edge after a few minutes at room temperature.
Could I prepare this in a loaf pan?
You can prepare this in a loaf pan by cutting your cake layers to fit the rectangular shape. Keep in mind that a loaf pan is deeper, so you may have slightly thicker ice cream layers.
Final Conclusion
There is something truly magical about serving a homemade chocolate ice cream cake to your family. It turns a standard evening into a celebration and provides that perfect balance of comfort and indulgence that only a freezer-chilled dessert can offer. By following these simple steps, you have created a stunning layered treat that rivals any expensive bakery version while keeping things friendly and accessible for your busy home kitchen. Whether you are hosting a birthday party or just want to treat your loved ones after a long week, this recipe delivers consistent results every time. I hope this cake becomes a tradition in your home just like it has in mine. Grab your whisk, start the oven, and prepare to delight everyone at your table with this cooling, fudgy masterpiece that proves homemade is always the better choice.
Print
Homemade Chocolate Ice Cream Cake
- Total Time: 480
- Yield: 10 servings
- Diet: Vegetarian
Description
This decadent chocolate ice cream cake is the perfect centerpiece for family celebrations. It features a moist, rich chocolate cake base layered with a creamy vanilla-fudge filling. This freezer-friendly treat is easy to make ahead of time, ensuring a stress-free dessert for any milestone. With simple pantry staples and a delightful combination of textures, it offers a store-bought quality with the warmth of a homemade masterpiece that kids and adults will adore.
Ingredients
1 cup All-purpose flour
1 cup Granulated sugar
3/8 cup Dark cocoa powder
1 tsp Baking soda
1 large Egg
1/2 cup Buttermilk
1/2 cup Vegetable oil
3/4 tsp Vanilla extract
1/2 cup Boiling water
8 oz Cream cheese, softened
8 oz Cool Whip, thawed
1 cup Hot fudge sauce
Instructions
Preheat your oven to 300 degrees Fahrenheit.
Whisk the flour, sugar, cocoa powder, and baking soda together in a large mixing bowl.
Add the egg, buttermilk, and vegetable oil to the dry mixture and beat until smooth.
Stir the vanilla extract into the boiling water, then carefully stir this into the cake batter.
Pour the batter into a prepared 9-inch round pan and bake for 30 minutes, or until a toothpick comes out clean.
Allow the cake to cool completely on a wire rack.
In a separate bowl, whip the softened cream cheese and fold in the thawed Cool Whip until smooth to create the vanilla filling.
Once the cake is cool, spread a layer of hot fudge over the top.
Spread the cream cheese-whipped topping mixture evenly over the fudge layer.
Freeze the cake for at least 8 hours or overnight to set before serving.
Notes
Use high-quality dark cocoa powder like Hershey’s Special Dark for the best color and flavor. Ensure the cream cheese is fully softened to prevent lumps in the filling. The cake must be completely cool before adding the cream and fudge layers to avoid melting the fillings.
- Prep Time: 30
- Cook Time: 30
- Category: Desserts & Sweets
- Method: Baking and Freezing
- Cuisine: American